Developer blog

.NET Global Exception Handler to Return Problem Details For Your APIs

May 14, 2025 By Esau Silva

This article will focus on handling custom exceptions for flow control on .NET with a global exception handler and return a problem details object. Having said that. There are, for the most part, two schools of thought. One where it is OK to throw a (custom) exception to control flow. i.e. Throw a UserNotFoundException when a user is not found. The second is implementing the Result Pattern where you return a Success or an Error to control the flow. i.e. Result.UserNotFound. Problem Details Problem details is the standard way of returning error messages from a REST API to the client. Say your API is validating for a required field. i.e. Name. If the name is not present in the API request, instead of only returning a 400 Bad Request HTTP Status Code, you return a problem details response detailing what went wrong with the request so clients can take action on the invalid request. The members of the problem details response are as follows: type – identifies the problem details type title – summary of the problem details status – HTTP Status code of the issue errors – details of what went wrong with the request { “type”: “https://httpstatuses.com/400”, “title”: “One or more validation errors occurred.”, “status”: 400, “errors”: { “Name”: [ “‘Name’ must not be empty.” ] } } Global Exception Handler You add the global exception handler to Program.cs like so var app = builder.Build(); app.UseExceptionHandler(GlobalExceptionHandler.Configure); Then the implementation of the GlobalExceptionHandler static class public static class GlobalExceptionHandler { public static void Configure(IApplicationBuilder builder) { builder.Run(async context => { var exceptionHandlerPathFeature = context.Features.Get<IExceptionHandlerPathFeature>(); // Declare the problem results IResult problemResult; // Switch statement to match the custom exceptions switch (exceptionHandlerPathFeature?.Error) { case UserAlreadyExistsException: { var details = new ProblemDetails { Type = “https://httpstatuses.com/409”, Title = “User already exists.”, Status = StatusCodes.Status409Conflict, }; problemResult = Results.Problem(details); break; } // Other custom exceptions, say UnauthorizedException and return // a 401 Unauthorized problem details // This custom exception here contains validation errors from // Fluent Validation case ApiValidationException: { // Casting the exception to ApiValidationException to get the // `Errors` property and send it back to the client var exp = (ApiValidationException)exceptionHandlerPathFeature!.Error; problemResult = Results.ValidationProblem ( exp.Errors, type: “https://httpstatuses.com/400”, statusCode: StatusCodes.Status400BadRequest ); break; } // If no custom exception is matched, return generic 500 Internal Server // error response default: { var details = new ProblemDetails { Type = “https://httpstatuses.com/500”, Title = “An error occurred while processing your request.”, Status = StatusCodes.Status500InternalServerError }; problemResult = Results.Problem(details); break; } } await problemResult.ExecuteAsync(context); }); } } Bonus! Minimal APIs and Fluent Validation With Minimal APIs, you have to invoke Fluent Validation inside the endpoint like so var validationResult = await validator.ValidateAsync(userSignup, cancellationToken); if (validationResult.IsValid is false) throw new ApiValidationException(validationResult.ToDictionary()); In the example above, I map the validation results to ApiValidationException custom exception. The global exception handler will handle this exception returning the appropriate error response with a 400 Bad Request status code And the ApiValidationException implementation details public class ApiValidationException : Exception { public IDictionary<string,string[]> Errors { get; } public ApiValidationException(IDictionary<string,string[]> errors) : base() { Errors = errors; } } .NET 8 There is a new way of handling global exceptions in .NET 8. I will write about it at some point. Having said that, the code shown here will also work with .NET 8.

.NET Core Options Pattern For Live Reload Settings

May 10, 2025 By Esau Silva

There are many great posts about implementing the Options Pattern .NET Core with IOptionsMonitor on the interwebs, but many fail to point out one “gotcha” when working with IOtionsMonitor to live reload settings. There are different ways to load settings into the dependency injection service container, but the way I like to do it is as follows: public record MySettings { [Required] public string Setting1 { get; init; } [Required] [Range(1, int.MaxValue)] public int Setting2 { get; init; } } Notice the data annotations, with the Options Pattern. It is possible to validate settings before they are even injected into your services. Below is how you bind and inject the settings into the dependency injection service container serviceCollection .AddOptions<MySettings>() .Bind(configuration.GetSection(nameof(MySettings))) .ValidateDataAnnotations() .ValidateOnStart(); Two important things to note here ValidateDataAnnotations() – As the name implies, this will use the data annotations on the record’s or class’ properties to validate the settings. You will need Microsoft.Extensions.Options.DataAnnotations NuGet package for this to work. ValidateOnStart()– Runs validations eagerly, when the app starts. Otherwise, the validations will run when the properties are accessed on whatever service you are injecting those properties. Remember I mentioned there is a “gotcha“? If you are explicitly adding the JSON configuration files, there is an optional boolean argument that will need to be set to true: reloadOnChange. builder.AddJsonFile(“appsettings.json”, reloadOnChange: true); Without reloadOnChange set to true, live reloading of the settings will not work. Now, injecting the settings to enable live reloading using IOtionsMonitor<TOptions> public sealed MyClass { IOptionsMonitor&lt;MySettings&gt; _mySettingsDelegate; public MyClass ( IOptionsMonitor&lt;MySettings&gt; mySettingsDelegate ) { _mySettingsDelegate = mySettingsDelegate; } public void DoSomething() { var setting1 = _mySettingsDelegate.CurrentValue.Setting1; var setting2 = _mySettingsDelegate.CurrentValue.Setting2; } } IOptionsMonitor is registered as a singleton and can be injected into any service lifetime. Upon appsettings.json changing, the service will get the new values when it is called. To learn more about IOptionsMonitor and the other Options Interfaces, head over to the Microsoft Documentation: ASP.NET Core | Microsoft Learn

Configure CORS in .NET

May 7, 2025 By Esau Silva

We need to configure CORS in .NET (or really in any other language) when an application’s front-end and back-end are being served from different domains, aka origins. And more than likely, during development, both the front-end and back-end will be running from different ports on localhost. But what is CORS? Cross-Origin Resource Sharing (CORS) is an HTTP-header based mechanism that allows a server to indicate any origins (domain, scheme, or port) other than its own from which a browser should permit loading resources. From MDN Basically, the server telling the browser “Hey, I only allow domains configured in my CORS policy, are you one of those?” Enable CORS in .NET CORS in .NET is enabled via middleware as follows // Program.cs var builder = WebApplication.CreateBuilder(args); builder .services .AddCors(…); var app = builder.Build(); app.UseCors(“PolicyName”); UseCors must be placed after UseRouting and before UseAuthorization. This is to ensure that CORS headers are included in the response for both authorized and unauthorized calls. (From the official docs) Configure CORS in .NET It is important to have the front-end origin as a configuration in appsettings.json so that when deploying to upper environments and production, a configuration transformation can happen. { “CorsSettings”: { “FrontendOrigin”: “http://localhost:3050” } } Rather than having the configuration in Program.cs, I like to create a static class and a static method returning an Action. // Program.cs var builder = WebApplication.CreateBuilder(args); builder .services .AddCors(Cors.Configure(builder.Configuration)); // Static method that takes in IConfiguration var app = builder.Build(); app.UseCors(Cors.FrontEndPolicyName); // Policy name as a static prop in Cors class In my static Cors class, I read the front-end origin setting to use in the configuration. // Cors.cs public static class Cors { public const string FrontEndPolicyName = “AllowFrontEnd”; public static Action<CorsOptions> Configure(IConfiguration configuration) { var frontendOrigin = configuration .GetSection(nameof(CorsSettings)) .Get<CorsSettings>()? .FrontendOrigin; // Only in .NET 8. In .NET 7 use .ThrowIfNullOrEmpty ArgumentException.ThrowIfNullOrWhiteSpace(frontendOrigin, nameof(frontendOrigin)); return options => { options .AddPolicy(name: FrontEndPolicyName, policy => { policy .WithOrigins(frontendOrigin) .AllowAnyHeader() .AllowCredentials(); policy.WithMethods(“POST”,”GET”); } ); }; } } WithOrigins – Configure your front-end origin, or origins if more than one AllowAnyHeader – As the name implies, allow all headers from the browser. Use WithHeaders if only allowing specific headers AllowCredentials – This is required if you have a login page. The front-end will send credentials to the server and the server will respond with Access-Control-Allow-Credentials: true. The server will block the request otherwise. WithMethods – Allow specific HTTP request methods. Use AllowAnyMethod to allow all HTTP request methods. BONUS! Configure Fetch API on the Front-End fetch(`URL`, { method: ‘POST’, mode: ‘cors’, credentials: ‘include’, headers: { ‘Content-Type’: ‘application/json’, }, body: JSON.stringify(‘{}’), }); Mode cors must be included as an option in the request. credentials must also be included. If credentials are not included, the request will not include the authentication cookie, and authenticated routes will not be reached.
Postman Tips for Better API Testing

Postman Tips for Better API Testing

April 29, 2025 By Esau Silva

Postman is a powerful tool for testing and working with APIs. In this blog post, I will describe some Postman tips for better API testing that I have used for quite some time and have helped tremendously. Testing an API Response Postman makes it easy to test API responses. You can test for HTTP Status Codes, expected and non-expected responses, and headers, among other useful information about the response. For the rest of this post, I will be calling the GitHub API for the examples. Say we want to test a successful response by calling the following endpoint: https://api.github.com/users/esausilva   The following will be the response. { “login”: “esausilva”, “id”: 9492978, “node_id”: “MDQ6VXNlcjk0OTI5Nzg=”, “avatar_url”: “https://avatars.githubusercontent.com/u/9492978?v=4”, “gravatar_id”: “”, “url”: “https://api.github.com/users/esausilva”, “html_url”: “https://github.com/esausilva”, “followers_url”: “https://api.github.com/users/esausilva/followers”, “following_url”: “https://api.github.com/users/esausilva/following{/other_user}”, “gists_url”: “https://api.github.com/users/esausilva/gists{/gist_id}”, “starred_url”: “https://api.github.com/users/esausilva/starred{/owner}{/repo}”, “subscriptions_url”: “https://api.github.com/users/esausilva/subscriptions”, “organizations_url”: “https://api.github.com/users/esausilva/orgs”, “repos_url”: “https://api.github.com/users/esausilva/repos”, “events_url”: “https://api.github.com/users/esausilva/events{/privacy}”, “received_events_url”: “https://api.github.com/users/esausilva/received_events”, “type”: “User”, “user_view_type”: “public”, “site_admin”: false, “name”: “Esau Silva”, “company”: “Ingo Payments”, “blog”: “https://esausilva.dev/”, “location”: “Nashville Metro Area, TN”, “email”: null, “hireable”: true, “bio”: “Full Stack Software Engineer”, “twitter_username”: “_esausilva”, “public_repos”: 27, “public_gists”: 6, “followers”: 166, “following”: 19, “created_at”: “2014-11-01T02:42:50Z”, “updated_at”: “2025-04-04T01:32:39Z” } We want to test for 200 OK status code, that id is an integer, company is not null and name is equal to “Esau Silva”. We would write the following JavaScript code under the “Scripts -> Post-response” tab of the request. // Get the request response var res = pm.response var resData = pm.response.json() // Test assetions pm.test(“Assert HTTP Status = 200 OK”, function () { res.to.have.status(200) }); pm.test(“Assert ‘id’ Is Greater Than 0”, function () { // Match numbers pm.expect(resData.id).to.match(/^\d+$/i) }); pm.test(“Assert ‘company’ Is Not Null”, function () { pm.expect(resData.company).to.be.not.null }); pm.test(“Assert ‘name’ Is ‘Esau Silva'”, function () { pm.expect(resData.name).to.be.eql(‘Esau Silva’) }); To run the tests click on the ellipsis of the collection on the left panel, select “Run“, and finally click the “Run” button. You will see the passing results in the following screen after running the collection. You might be asking, where is this useful? Well, this can be extremely useful as the last step of your CI/CD pipeline after deployment to DEV and/or UAT environments. You can validate that nothing was broken after your latest deployment, API contracts stayed the same, and no unexpected/unintentional behavior was introduced. In Azure DevOps, you can install newman CLI NPM package to run the Postman collection and fail the deployment if one of the test scenarios fails. Now, say you have error validation responses, which ideally you are returning a 404 HTTP Status Code along with a Problem Details response. You could write something like this: // Get the request response var res = pm.response var resData = pm.response.json() // Test assetions pm.test(“Assert HTTP Status = 404 Not Found”, function () { res.to.have.status(404) }); pm.test(“Assert ‘error’ Message”, function () { pm.expect(resData.message).to.be.eql(‘Not Found’) }); In this case, I misspelled the username route in the following request: https://api.github.com/users/xesausilva then test for the expected failure response. Setting Postman Variables Dynamically Say you have several requests that need to be called one after another where the previous response is needed for input for the following request. You can set Postman Collection Variables under the “Scripts -> Post-response” tab as well as below: /* In this example, I’m hard-coding the variable, but in a potential real use case, you can use a response value to populate the variable, say “resData.id” */ // Create `anime` collection variable and set it for // the next request pm.collectionVariables.set(‘user_gists’, ‘gists’) Then for the following request, you can use that variable in the following format: {{user_gists}}. Like so https://api.github.com/users/esausilva/{{user_gists}}  A note side note here, you can also use Collection Variables in the body of the request as well. Sometimes, you need to generate a random variable BEFORE you execute a request, and this variable does not depend on a previous request. For this scenario, you set it under the “Scripts -> Pre-request” tab. You could write something like this function randomNumber(min, max) { return Math.floor(Math.random() * (max – min + 1)) + min; } var routes = [‘followers’,’gists’,’following’,’starred’,’orgs’] // Create `routes` collection variable and assign a // random route title from `routes` array pm.collectionVariables.set( ‘routes’, routes[randomNumber(0,4)] ) Then use the routes variable like so https://api.github.com/users/esausilva/{{routes}}  Now, before each request call, Postman will assign a random route from the given list and call the API. How is this useful? Say a request needs to be called with a unique value to avoid hitting idempotency, this way you can generate a random integer or a GUID to send in the request. Performance / Load Testing with Postman In one of my previous posts, I describe how Postman can be used to run performance/load testing: https://payments.ingomoney.com/developer-blog/run-load-performance-testing-with-postman/  But what I want to point out here is that Postman exposes the iteration number in the following property var iteration = pm.info.iteration iteration property will be “0” the first time and increments each time the script runs under a load testing scenario. This can be useful when we want to set some variable based on the iteration number. A real-life use case: I was testing idempotency in one of our APIs and needed a way to tell Postman to alternate between using the same request id field and a new one. By making use of the iteration property, I was calling the API with the same ID on even iteration numbers and a new one on odd iteration numbers. I hope you were able to learn something new and are ready to use Postman to its fullest in your day-to-day work.

Unintended Side Effects with .NET Core Service Lifetimes and Dependency Injection (DI)

March 5, 2025 By Esau Silva

We have an API that handles ~45k monthly requests that occasionally responded strangely. I suspected it was related to the .NET Core service lifetimes. The symptoms in question were that, out of the blue, the API response body included a status code of 409 with a message of “invalid user-provided values”; however, the actual HTTP response status code was 200. From then on, the API would respond with the same invalid body, no matter what the request was. To give a little background, the API is deployed on-premises as multiple instances of Windows services. And the fix? Well, the fix for this issue was to simply restart the Windows services. After the restart, the API would start responding as expected. Finding the IssueAfter debugging and stepping through the code locally, I reached a base class holding a list of validations for the Domain Entities  (IList<SpecificationValidationResult> _validationResults = new List<SpecificationValidationResult>()). It was here that I noticed this list was holding validations throughout the application’s lifetime—in other words, a singleton instance of the validator class. The problem? Well, if a validation result reached an invalid state, the list would hold this invalid state for any future requests, returning a failure upon list evaluation. Fixing The Service LifetimesUpon looking at the Dependency Injection (DI) configurations, I noticed the validator was being configured as Transcient; however, the services running the configurations were configured as Singleton. This means that upon the singleton services receiving the first request, they would instantiate the validator for the first time and keep the same instance throughout the service lifetime. The original intention of having the validators be Transcient was to have one validator instance per HTTP request. However, running a Transient service from within a Singleton service will effectively make the Transcient service a Singleton. Refactoring the validators as Scoped and the services to Transcient fixed the issue. It gave the validators back their original intent, which was to live only the duration of the HTTP request. Moral of the Story Make sure you are implementing the correct DI for your use case and test the application thoroughly before deploying! There are plenty of tutorials out there that show how .NET Core service lifetimes and Dependency Injection (DI) work, however, the most useful one I have found is “Dependency Injection Deep Dive” by Amichai Mantinband https://youtu.be/yjUCKSKCQxg?si=oSnza8jZpk4x9PMS”. Have you run into any issues regarding service lifetimes? Let me know in the comments below!

Run Load (Performance) Testing with Postman

March 5, 2025 By Esau Silva

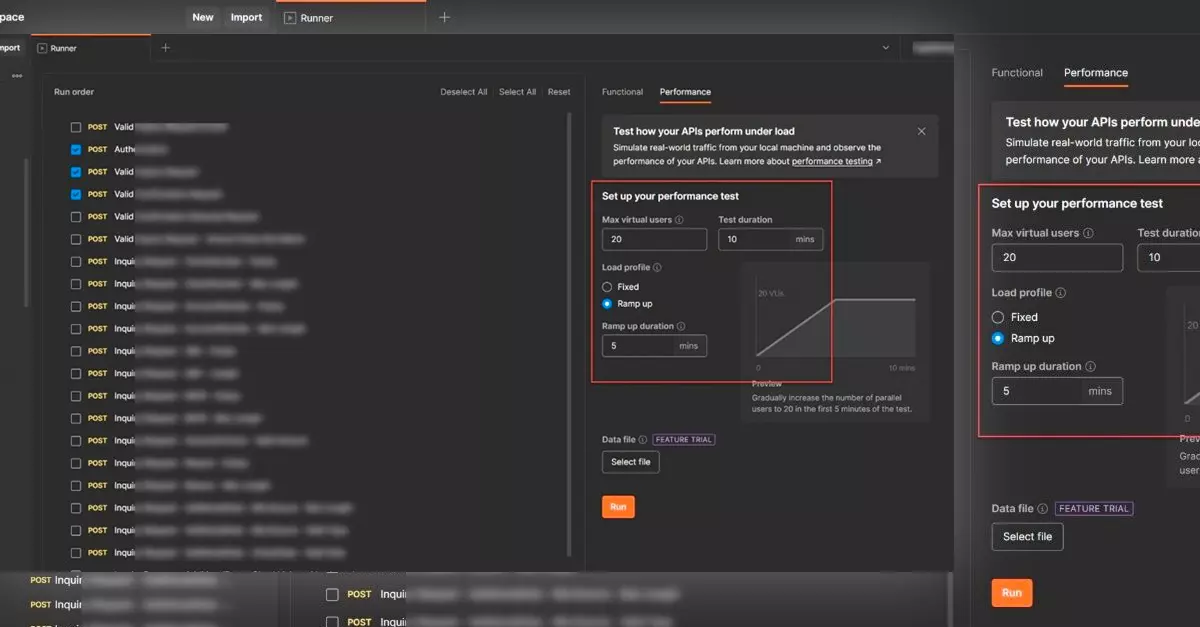
I recently found that Postman has a built-in capability to run load (performance) testing. Some use cases to run load testing are identifying bottlenecks, latency, and failures in your API when calling at near-production scale. One of the advantages of Postman having built-in load testing is that I already have collections/environments for all of my APIs in Postman. So, I do not have to use a different tool for the job or migrate scripts to another platform. I have used load testing a few times at work: One of our APIs had slow responses in production. I did a re-implementation and load-tested the API locally as well as in our development and UAT environments with Postman, both pre- and post-implementation. Another instance occurred after implementing idempotency on another of our APIs. Several scenarios were tested: The first call goes through successfully. Subsequent calls return an in-flight or in-progress transaction. Once the first call finishes, subsequent calls return idempotent responses. Running Performance TestingSelect the Postman collection to perform the performance testing, click the three dots at the top right, and then click “Run Collection.” Select the scripts to run the performance testing on. Select the “Performance” tab on the right. There will be three options: Max Virtual Users: How many “users” will run simultaneously calling the collection. Test Duration: How long the testing will last. Load Profile: If all “users” will start calling the API at the same time (Fixed) or if there will be a Ramp Up time where all “users” will start calling the API after a period of time. After the test has finished running, you will get a nice graph with detailed results. Some statistics include the total number of requests, requests per second, response times, and errors, if any. If errors are present, you can see detailed responses, status codes, etc. When you select a particular collection, you can press the “Runs” tab to see past runs, then select a particular run to see details. I hope you learned something about load/performance testing and start applying this technique to test your APIs. Have you had any experience with load/performance testing and have you used Postman for this? JMeter maybe?